First-time login
The dashboard is a website. Your admin sends you a link and login credentials (email + password). Bookmark the link. You'll open it every day.
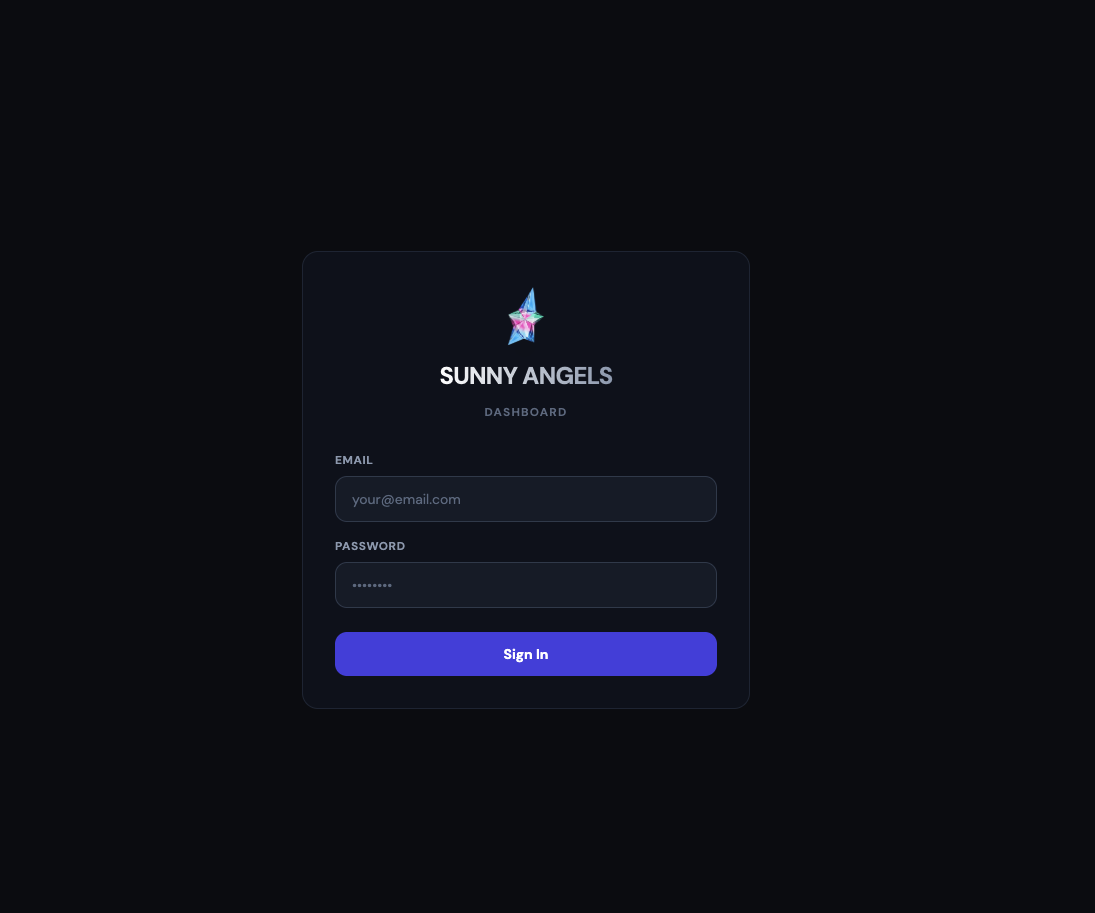
Step by step
- Open the dashboard link your admin sent you.
- Type the email you received. Most worker emails look like
yourname@workers.sa-internal.com. - Type the password from your welcome message.
- Click Sign In.
- If you were assigned more than one model, a picker appears. Tap the model you want to work on today. You can switch models later from the profile menu (top right).
The onboarding overlay
Right after your very first successful login, a full-screen onboarding overlay pops up. It walks you through the dashboard in a few short slides. Read all of them. It's the fastest way to understand what each part is for.
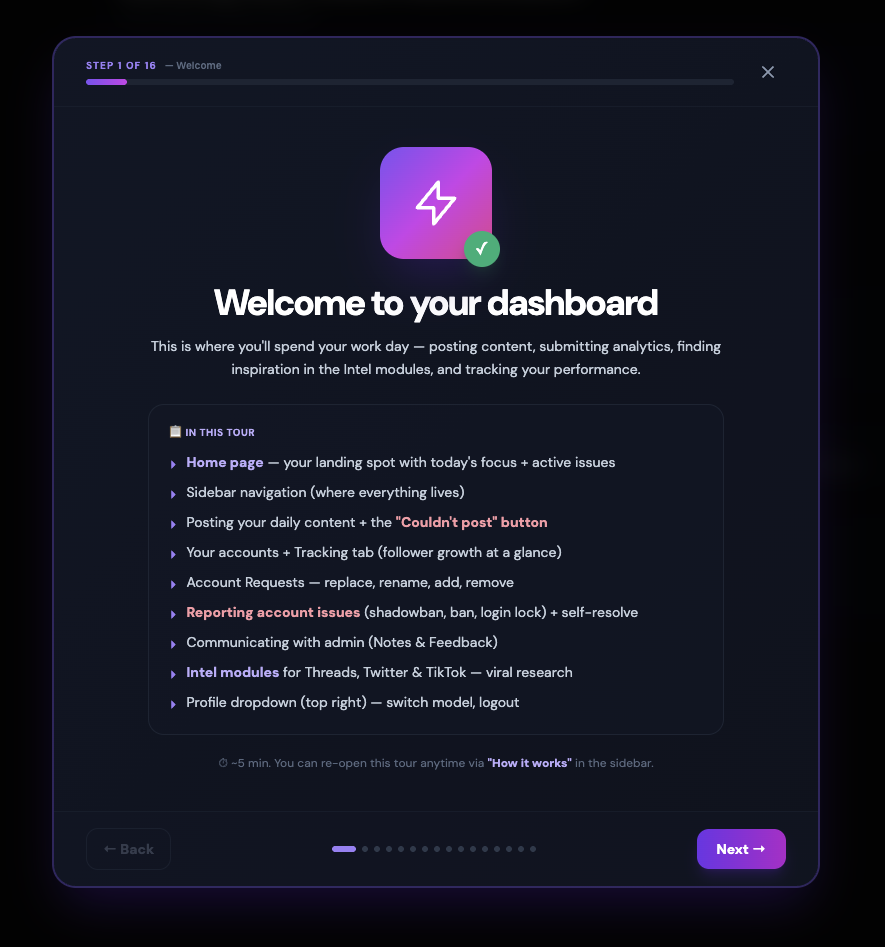
You can re-open this any time later from the How it works tab in the sidebar (the top button, marked violet). Do not close it and forget it exists. It's the reference for every button and every color code in the app.
Phone vs. Desktop (read this once)
The dashboard runs both on a laptop / desktop browser and on your phone browser. The content is the same, but the layout adapts. Knowing where things sit on each will save you a lot of confusion later.
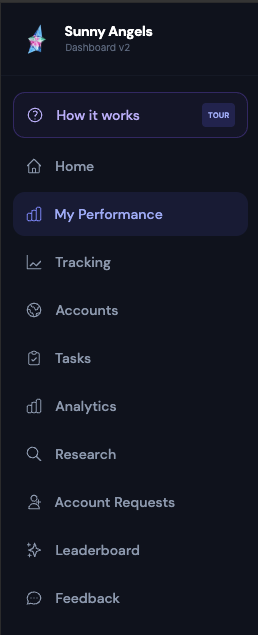
The sidebar (all tabs live here)
Desktop / laptop
The sidebar is always visible on the left edge of the screen. Every tab (Home, Tasks, Analytics, etc.) is one click away. You never open a menu to reach it.
Phone
Screens are too narrow for a permanent sidebar, so it's hidden by default. Open it with the menu icon (three lines, ☰) at the very top-left of the header. A drawer slides in from the left with the same list of tabs. Pick one, and the drawer closes automatically. Close it manually by tapping outside it, or tapping ☰ again.
Layout differences you'll notice
- Tables (like Tracking) become card lists on the phone. Same data, stacked vertically so it doesn't spill off the screen. See the Tracking section for a concrete example.
- Forms and dropdowns use the full screen width on the phone (so they're easy to hit with a thumb). On desktop they stay narrow.
- Detail panels. when you tap an account or worker for details, on desktop a panel slides in from the right; on phone it takes over the whole screen (close with the ✕ button top-right).
- Screenshots in this tutorial mostly show the desktop layout. On phone the same buttons and sections exist, they're just arranged vertically instead of side-by-side.
Which one should I use?
Both work. Rule of thumb:
- Phone is faster for daily work: submitting posts, marking reels done, filing "Couldn't post" excuses. The platforms you're posting on are on your phone anyway, so copy-pasting URLs is one hop.
- Desktop is better when you review a lot of data at once: reading the Tracking table across 30 days, comparing accounts, reading long guide sections, filling out weekly Analytics for many accounts.
How it works (violet button, top of sidebar)
The button labelled How it works at the very top of the sidebar (violet border) re-opens the same onboarding slides you saw on your first login. Any time you're not sure what a section does or a new feature was added, come back here.
Home
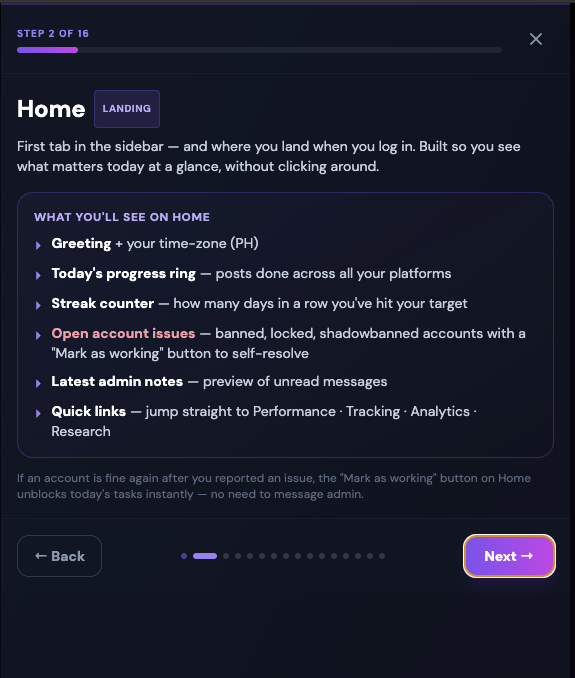
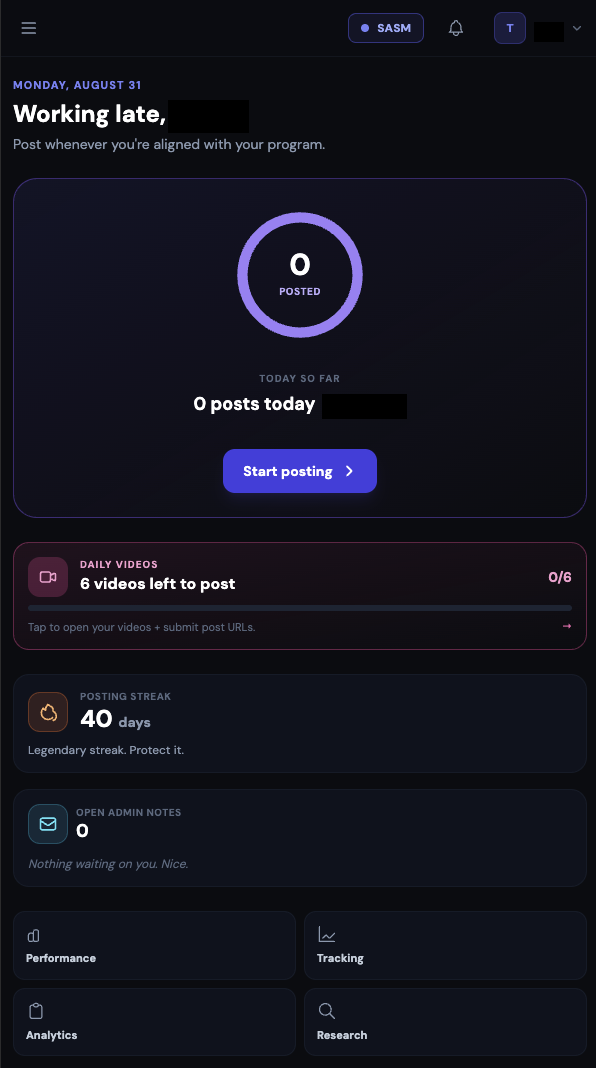
The Home tab is your daily landing page. Every time you log in, you see this first. It answers one question at a glance: "What do I still have to do today?". and gives you shortcuts to everything else you need.
Sections you see, top to bottom
Greeting
Today's date and a time-based hello: "Good morning", "Good afternoon", "Good evening", or "Working late" late at night. Followed by your name. A short sub-line tells you where you stand: "Here's what your day looks like", "All set for today. Nice work.", or "You're on time off today. Enjoy it."
Time-off card (only if you're on leave today)
If admin scheduled a leave for you and today falls inside it, the progress card is replaced by an amber Time off banner showing the leave dates. No posting required. Your streak is paused, not broken, and picks up when you're back.
Progress ring + platform pills
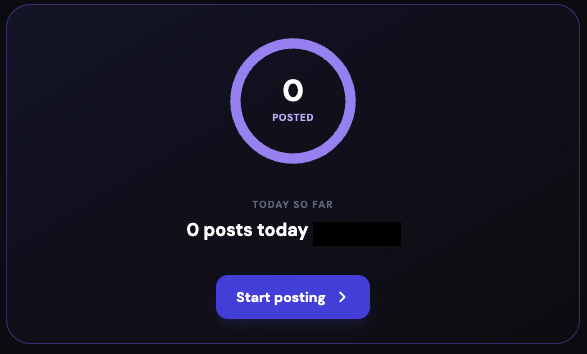
The big card near the top shows a circular progress ring with today's % in the middle (not a horizontal bar). Green when you're done, indigo mid-way, amber when you're behind. The line next to it reads "X of Y posts done", and small colored pills below show the split per platform (TT 3/5, X 1/3, TH 0/3, FB 1/1, IG 2). A large Start posting / Review today button jumps you straight into the Tasks tab.
Daily Videos shortcut (only if videos exist for today)
If admin uploaded AI-videos for you today, a purple shortcut card appears above the streak grid. Tap it → jumps you to the Daily Videos section in Tasks.
Two cards side-by-side: Posting Streak + Open Admin Notes
- Posting Streak. how many days in a row you completed your tasks. Comes with a motivational one-liner ("Keep going. Momentum builds fast", "You're on fire. Don't break it", etc.). Resets to 0 the day you leave something undone.
- Open Admin Notes. how many admin notes are currently open on you, plus a preview of the two most recent. Tap Open → to jump to the Feedback tab where you reply and resolve them.
Open account issues banner (only if any incidents are active)
If any of your accounts is currently flagged as Shadowban / Action Block / Login Lock / Takedown / Banned / Warning, a red-bordered banner lists each affected account. Each row shows the incident type, account name, and how long ago it was reported. For most incident types there's a green Mark as working button. Hit it as soon as the account is fine again and your Tasks unblock for it. Exception: banned accounts can't be self-resolved. Admin has to replace the account first via your Account Request.
Quick links row (4 buttons)
A row of shortcut buttons to your most-used tabs: Performance, Tracking, Analytics, Research. Same as tapping them in the sidebar. Just faster from Home.
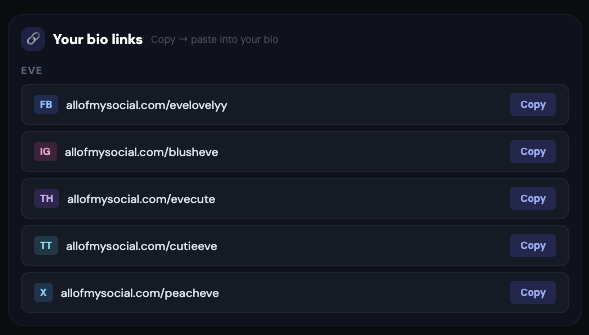
Your bio links
The AOMS bio-link URLs assigned to your model. The URL you paste into the account's Instagram / TikTok / etc. bio (the "website" field). Tap the copy icon next to a URL and it lands in your clipboard. If your model's bio-link was recently changed, a popup at the top of Home also nudges you to update the bios.
My Performance
This tab shows how the accounts you manage are actually doing. Follower growth, views, which accounts are growing vs. declining, and your recent posting activity. There is no single "score" here; the tab is a set of dashboards you read like a report. Almost every heading has a small ⓘ info button next to it. Tap it any time you're unsure what a section means.
Filters at the top
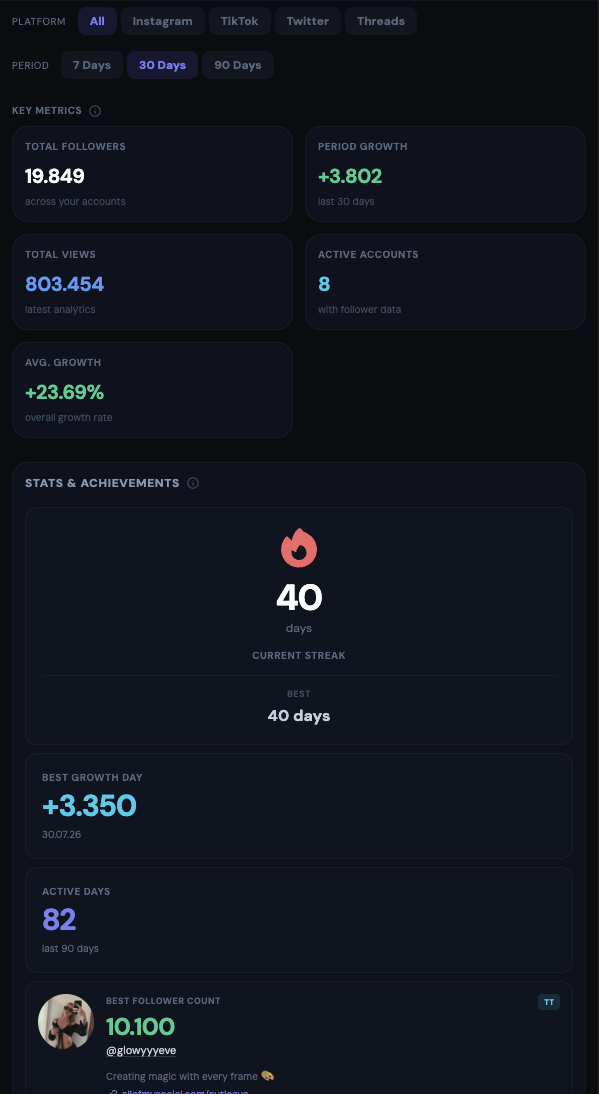
Everything below the header updates when you change these two filters:
- Platform. All / Instagram / TikTok / Twitter / Threads. Pick one to isolate the numbers for that platform, or leave on All.
- Period. 7 Days / 30 Days / 90 Days. The comparison window for growth and views.
Key Metrics (5 KPI tiles)
- Total Followers. sum across all your accounts (in the selected platform).
- Period Growth. how many followers you gained (green +) or lost (red −) over the selected window.
- Total Views. from your most recent weekly analytics submissions.
- Active Accounts. how many of your accounts have follower data being scraped.
- Avg. Growth. the average % growth rate across your accounts.
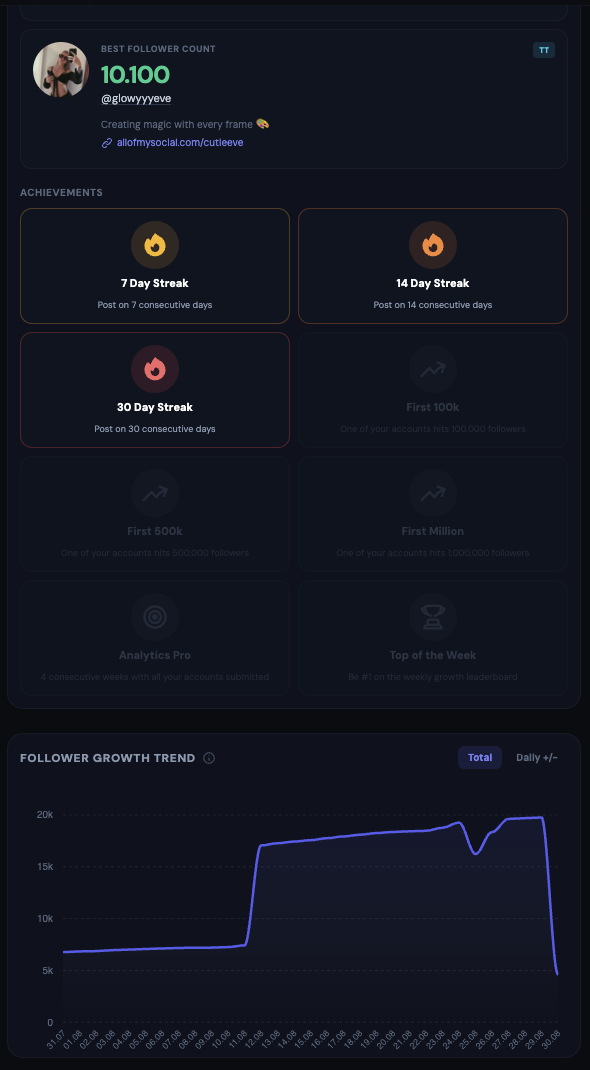
Stats & Achievements
Your personal streaks, achievements, and personal-best records. Streaks (like posting-days-in-a-row) reset when you skip a day, so this section is your motivator to stay consistent.
Follower Growth Trend (chart)
A chart of follower counts over the selected period. Two modes via the buttons top-right:
- Total. the running total of followers, day by day. Look for an upward slope.
- Daily +/−. a bar per day showing net change. Green bars are gains, red bars are losses.
Quick Leaderboard
Two mini-lists on the right side of the chart row:
- Top Growth. your 5 fastest-growing accounts in the period.
- Top Views. your 5 highest-view accounts from the latest analytics.
Use this to see which accounts are actually pulling their weight. And which need attention.
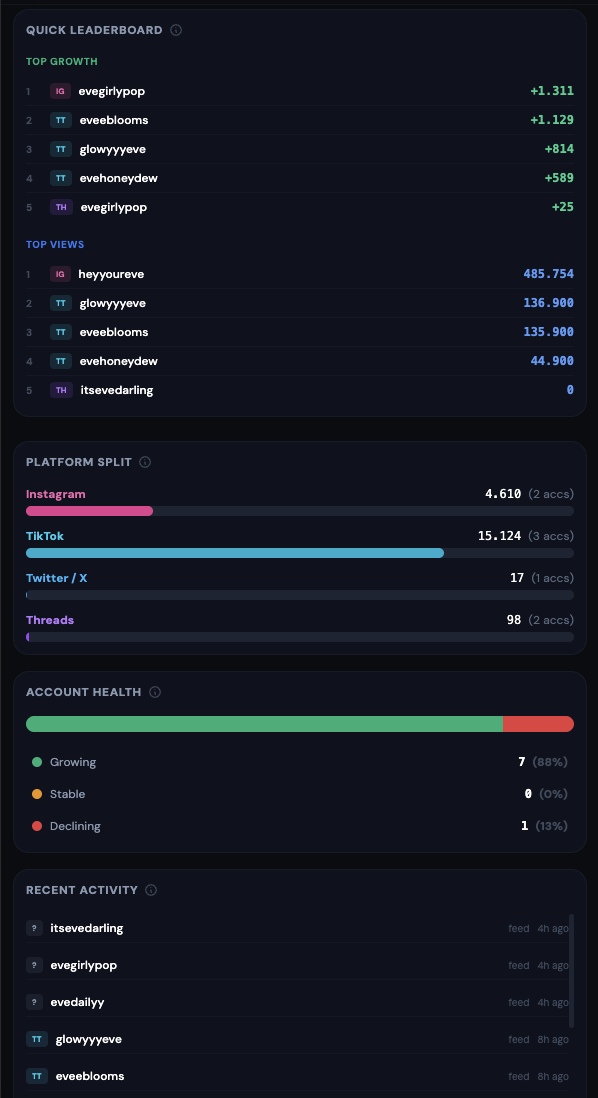
Platform Split
A horizontal bar per platform (IG / TT / TW / TH) showing how your total followers are distributed. Also shows the number of accounts per platform.
Account Health
A stacked bar that groups every account you own into three buckets:
- Growing (green). Followers went up in the period.
- Stable (amber). No meaningful change.
- Declining (red). Followers went down. These are the accounts to prioritize.
Recent Activity
Your last 15 posting actions: each row shows the platform badge, the account, and how long ago you posted. Excused rows (from "Couldn't post") appear here too, marked "excused".
Your Viral Posts (only when TikTok is in the filter)
Grid of your TikTok posts that crossed the viral threshold. Only visible when the platform filter is All or TikTok. the other platforms don't have viral tracking here.
Tracking
The Tracking tab shows the daily follower change over the last 30 days, one row per account. Its job is to answer at a glance: "Which of my accounts are actually growing, and which are quietly bleeding followers?"
How the daily colors work (same on desktop and phone)
Each day's cell is colored by that day's follower change:
- Bright green. big gain (≥ 50 followers)
- Medium green. solid gain (10–49)
- Light green. small gain (1–9)
- Grey. no change (0)
- Light red. small loss (1–9)
- Medium red. clear loss (10–49)
- Bright red. heavy loss (≥ 50)
- Empty / dark. no data was scraped that day (or the account was created after that day)
Desktop: the table view
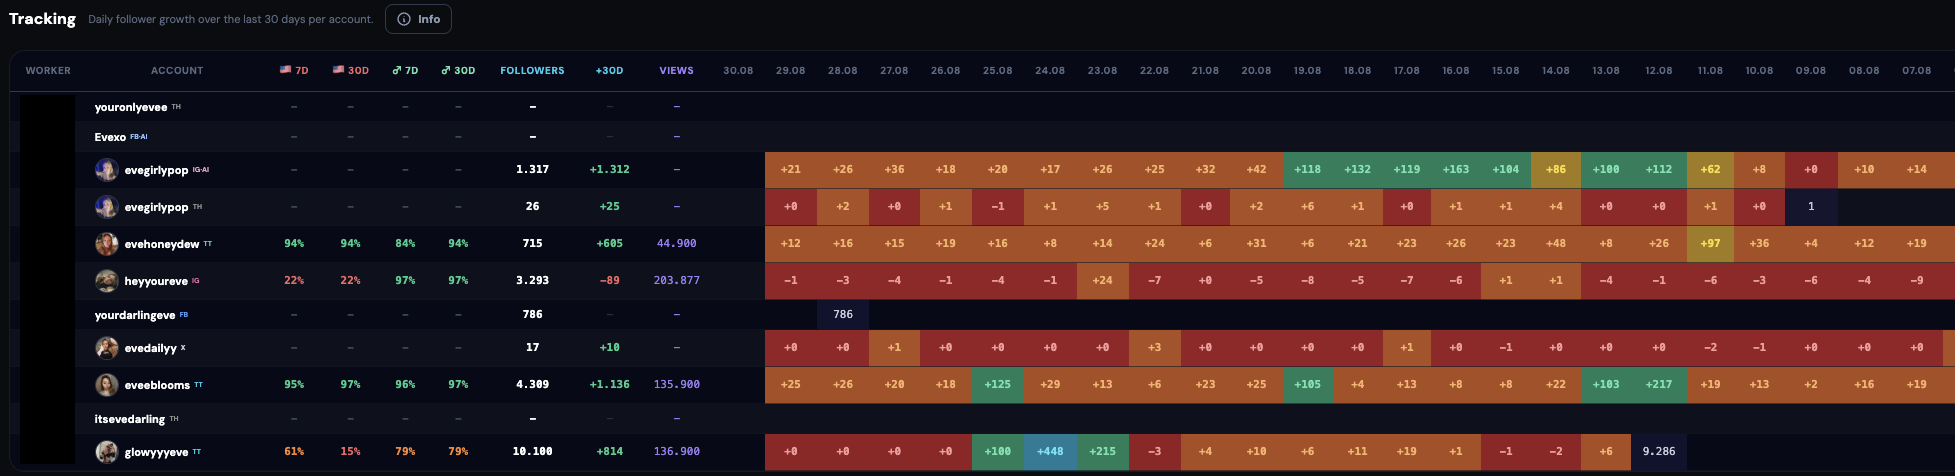
On a laptop / desktop browser you see a wide table:
- Rows = one row per account you manage (all your accounts sit under a single "your name" header).
- Columns = the first two columns are Worker (that's you) and Account; the next 30 columns are one column per day (oldest on the left, newest on the right).
- Cells are colored per the legend above. Hover a cell to see the exact number for that day.
- Scroll right to see older days; scroll down if you have many accounts.
- On smaller screens, the Worker and Account columns stay pinned on the left when you scroll horizontally. You never lose track of which row you're reading.
Phone: the card view
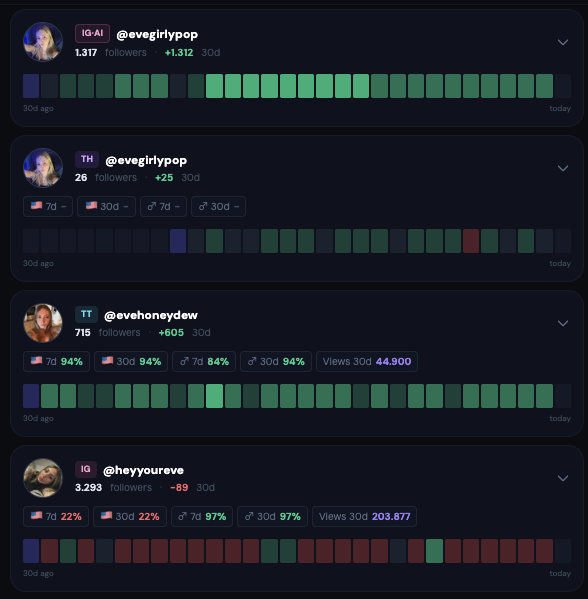
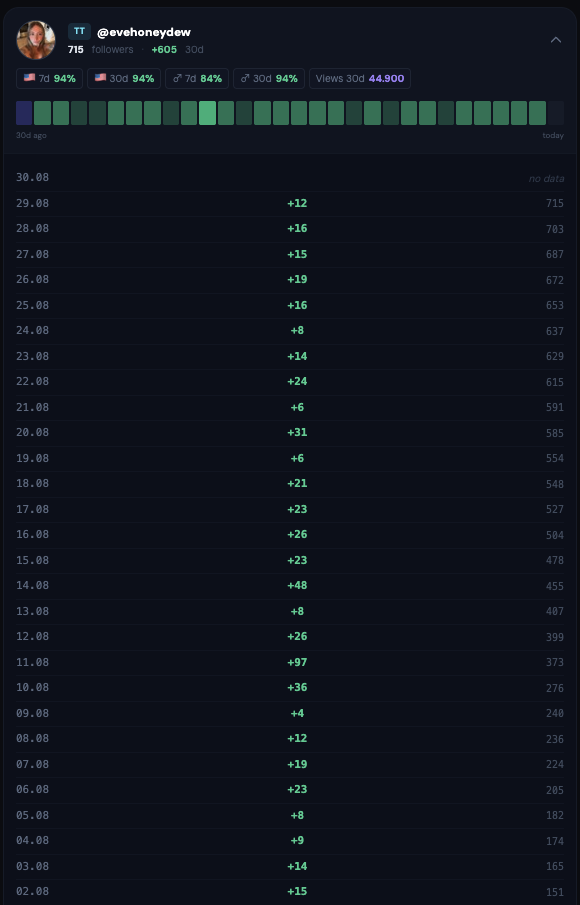
On your phone the table is replaced by one card per account, stacked vertically:
- Each card shows the account's profile picture, @handle, platform badge (IG / TT / TW / TH / FB), current follower count, and the 30-day change (a green + or red − number).
- Below that: a 30-day heatmap strip. 30 tiny colored bars in one row, oldest on the left, newest on the right. Same color rules as the desktop cells.
- Small info chips below the strip show the latest weekly-analytics numbers when submitted: 🇺🇸 US audience %, male audience %, Views 30d.
- Tap a card to expand it and see the per-day numbers as a list.
What to do with what you see
- Scan for accounts with a run of red days. Those need attention first.
- Cross-check with My Performance → Account Health to confirm the pattern (that section groups the same info as Growing / Stable / Declining).
- For a specific declining account: think about content, posting frequency, and whether the platform might be shadow-blocking it.
- Ban or lockout patterns → report via Account Requests (Replace or Remove). Content-driven decline → note it in the next weekly Analytics submission for that account.
Accounts
The Accounts tab is a searchable list of every account you manage, with the numbers next to each. Use it when you want to look up a specific account, compare a few side by side, or sort your accounts by growth or health without scrolling through the Tracking heatmap.
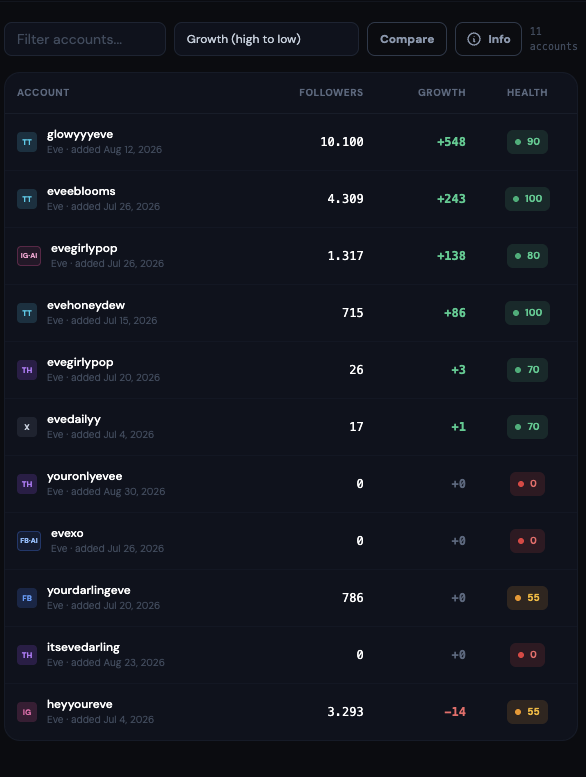
Top row of controls
- Filter accounts… input. Type a handle or part of a handle to shrink the list to matches.
- Sort dropdown with 7 options: Growth (high to low / low to high), Followers (high / low), Name (A. Z), Health (best first / worst first).
- Compare button. Turns on selection mode so you can tick 2 or more accounts and open a side-by-side comparison of their numbers.
- Info (ⓘ) button. Opens a modal that explains every column in detail.
The columns
- Account. The @handle plus platform badge.
- Worker. Your name (hidden on very narrow phone screens).
- Bio Link. The bio-link URL currently in the account's bio (hidden on smaller screens).
- Followers. Latest count from the scraper.
- Growth. Change over the last period (green +, red −).
- Health. Colored dot: green (growing), amber (stable), red (declining), grey (no data).
- Trend. Tiny sparkline of the last few follower snapshots (hidden on medium screens and smaller).
Comparing accounts side by side
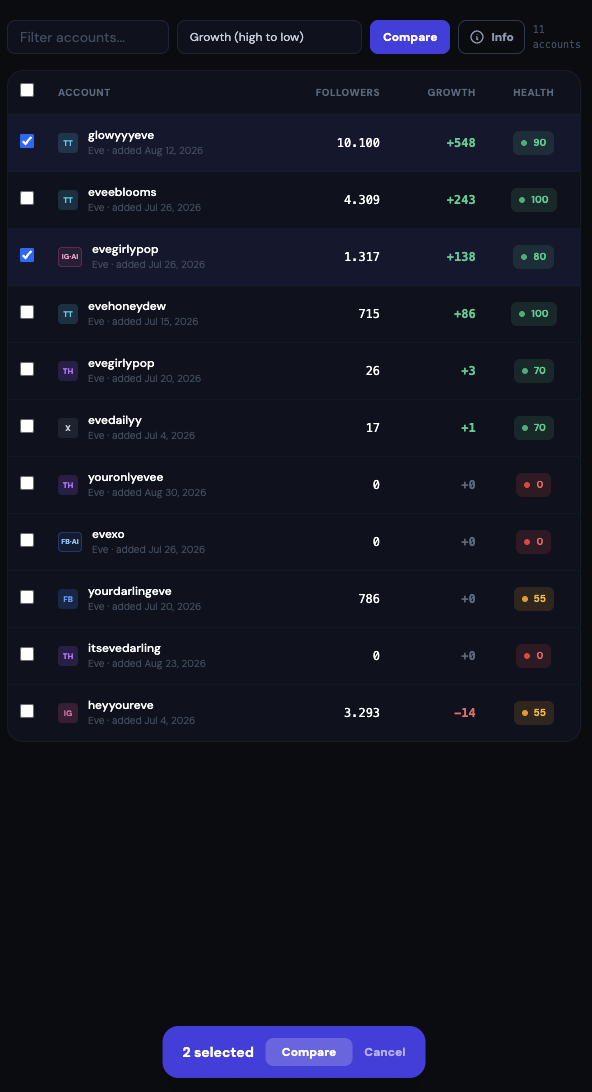
- Tap Compare in the top row. Checkboxes appear on each account row.
- Tick 2 or more accounts.
- A blue bar sticks to the bottom of the screen showing how many you've selected. Tap Compare on that bar.
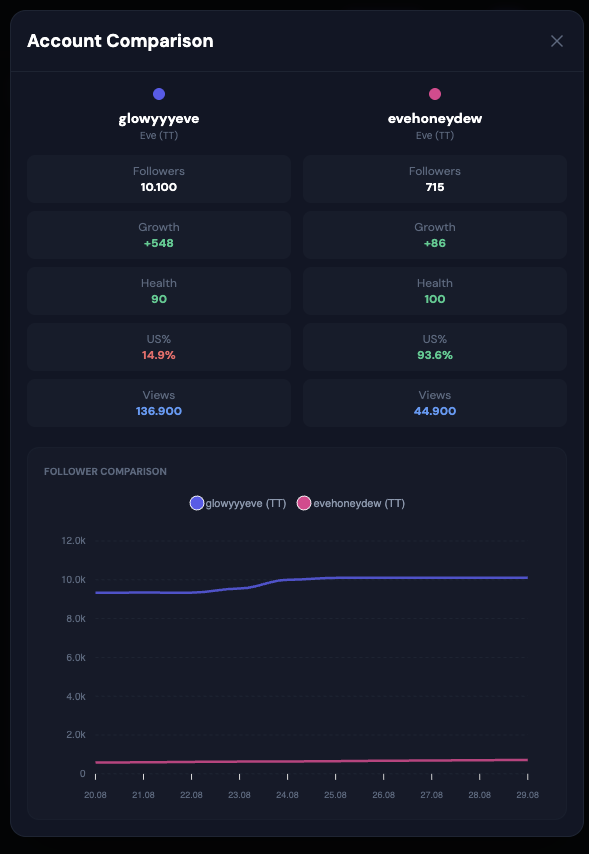
- A modal opens showing all selected accounts side by side: followers, growth curves, analytics numbers, recent activity.
- Close with the ✕. Tap Cancel on the bottom bar to leave selection mode without comparing.
Opening a single account
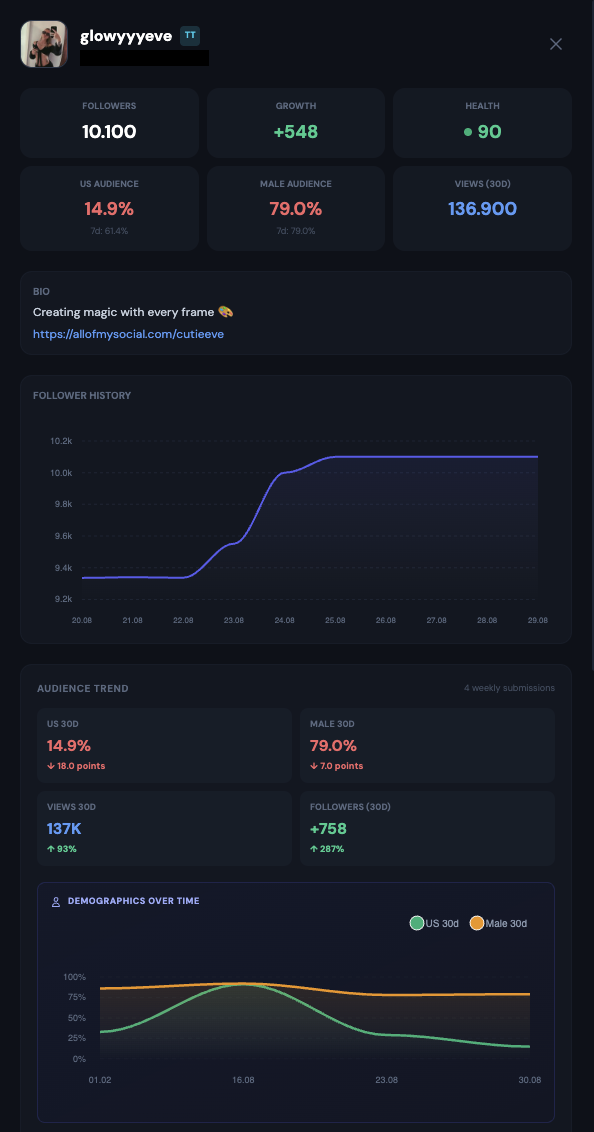
Tap any row (outside selection mode) to open the account detail panel. On desktop it slides in from the right and takes about half the screen; on phone it takes the whole screen. Inside you get: follower chart, latest analytics, bio-link history, recent posts, incident log. Close with the ✕ button in the top-right corner.
Tasks
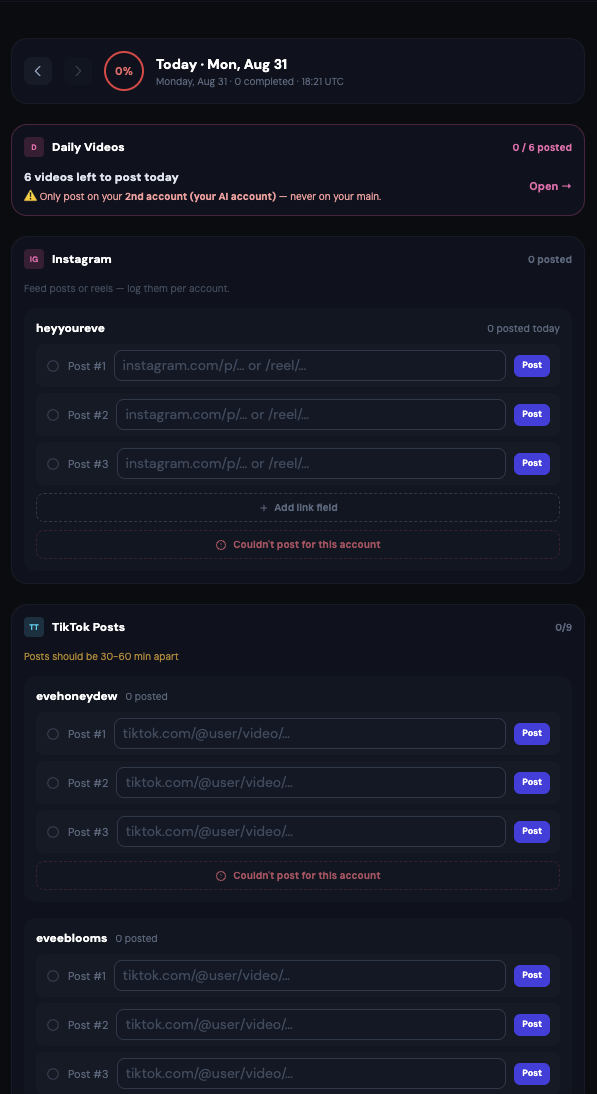
The Tasks tab is where you do the actual work: submit post links, mark reels as done, upload Daily AI Videos, and log a "couldn't post" note when something went wrong. All your accounts are grouped here by platform.
Which day am I looking at?
The tab defaults to today (Philippines time. The same day admin sees). Arrows above the account list let you navigate back through the last 7 days:
- Today. fully editable, this is where you submit new posts.
- Yesterday. still editable in a short window so you can add a late link or fix a mistake.
- 2–7 days ago. read-only. You can look but not change. Older than 7 days is not available on this tab; use My Performance / Tracking for older data.
If yesterday was incomplete and you land on Home this morning, a popup nudges you about it. Handle it either by filing a "Couldn't post" for those accounts (yesterday view) or letting it stand as a miss.
Time off (leave) view
If admin scheduled leave for you and the day you're viewing falls inside it, the whole task list is replaced by a big amber Time off banner instead of quota rows. No posting required. Your streak is paused. It picks up where it left off when you return.
Reading an account row
Each account you manage gets a row inside its platform section (Instagram, TikTok, Twitter/X, Threads, Facebook). Each row shows:
- The account name and handle
- A counter like
2/4. posts done today out of today's quota - Empty input fields waiting for your post URLs
Auto-excused accounts (banned, login lock, etc.)
If admin reported a severe incident against one of your accounts (banned / takedown / login lock / action block) and it's still active, the account is automatically excused for today. You don't need to file a "Couldn't post". You'll see a small note on that account's row. The auto-excuse rolls over every day until admin marks the incident resolved or replaces the account.
About the daily quotas
Every platform has a daily post quota per account. The number you see (like 2/4) is your target for that day, decided by admin. Not fixed forever.
Submitting a post
- Actually publish the post on the platform (Instagram / TikTok / Twitter / Threads / Facebook).
- Copy the URL of the specific post you just published. Not the URL of your profile page.
- Come back to the Tasks tab, find the account row you posted from.
- Paste the URL into an empty input field.
- Tap Post. The link is saved, the counter goes up by one, and admin sees your submission in real time.
https:// and open the exact post when clicked. The bare profile URL is rejected. Instagram, TikTok, Facebook and Twitter all have a way to copy the post URL. Usually via the share icon.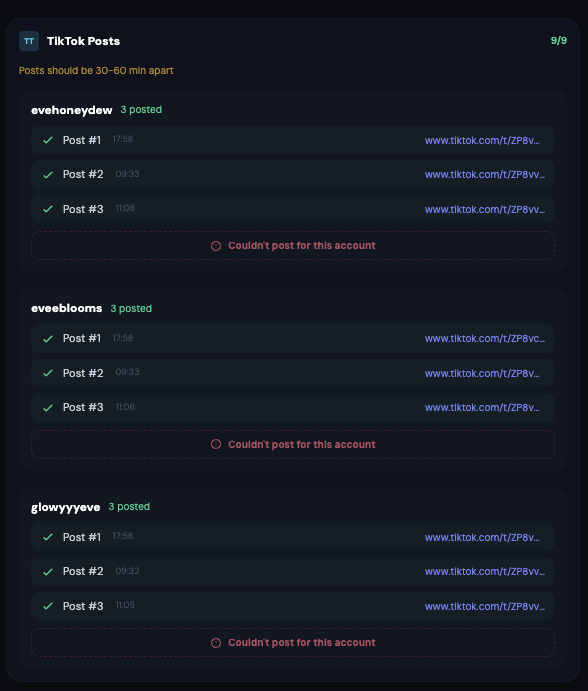
Deleting a wrong link
If you pasted the wrong URL, a small × icon appears next to each submitted link. Tap it. The link is removed and your counter drops back. This only works within a short time window after you submitted; older links are locked to keep the history clean.
Couldn't post today?
Something stopped you from posting on an account today. The app crashed, the account is temporarily locked, no content was ready, whatever. Don't just leave the slot empty. That counts as a missed post and hurts your score.
Instead, at the bottom of every account row you'll see a small red-bordered button:
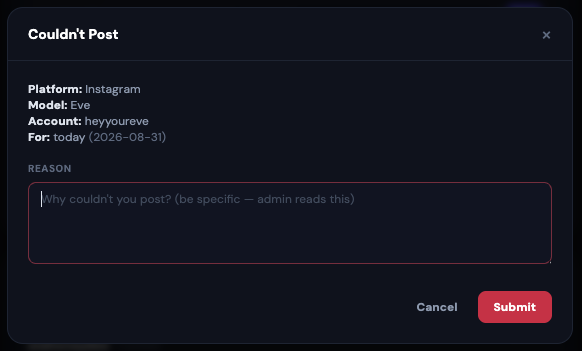
- Tap Couldn't post for this account.
- Type a clear reason (at least 5 characters). Be specific: "IG rejected 3 attempts, error 500" is useful; "nope" or "idk" is not.
- Tap Submit.
Admin sees your request in the "Couldn't Post" review queue and either approves it (the missed post no longer counts against you) or asks for more detail.
Reels (Instagram only)
If you're whitelisted for reels, a Reel Post card appears at the bottom of Tasks. Reels are always Instagram. They come in two ways: admin assigns one to you, or you request one yourself.
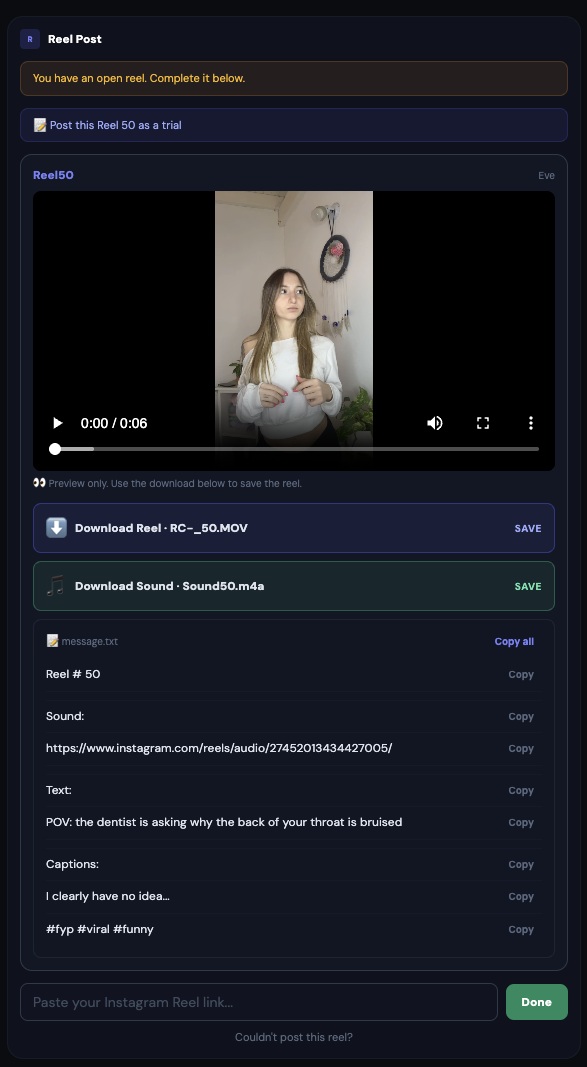
Working through a reel
- The card shows the reel number, admin's note (if any), and the video file(s) to download.
- Download the video. Post it as a Reel on the Instagram account this model owns.
- Copy the URL of the reel you just posted. It looks like
https://www.instagram.com/reel/Cxxxxxxx/. - Paste it into the input field on the reel card (placeholder: "Paste your Instagram Reel link...").
- Tap the green Done button.
If admin assigned you more than one reel for the same day, the next reel appears immediately after you finish the first. Complete them all. There is no cooldown between admin-assigned reels.
Requesting a reel yourself
If nothing is assigned but you want to work on one, tap the blue Get My Reel button. The dashboard picks a random unassigned reel for your model. A 16-hour cooldown applies between self-fetched reels, so you can't burn through the whole pool at once. Admin-assigned reels are exempt from this cooldown.
Couldn't post the assigned reel?
If the reel admin assigned you can't be posted for some reason (video corrupted, account temporarily locked, content problem), there is a small link under the reel card: Couldn't post this reel?. Tap it, write a clear reason, submit. Admin reviews and either releases the reel back to the pool or reassigns it. Do not just leave it sitting on your card, that blocks the reel from anyone else.
https://www.instagram.com/reel/… or https://www.instagram.com/p/…. Nothing else is accepted.Daily AI Videos (only if you have AI accounts)
If your model has AI-generated variants(for example IG-AI or FB-AI accounts), a Daily Videos section is added to your Tasks day. Admin uploads AI-generated video files daily; you download them add a text on them and post to the AI accounts.
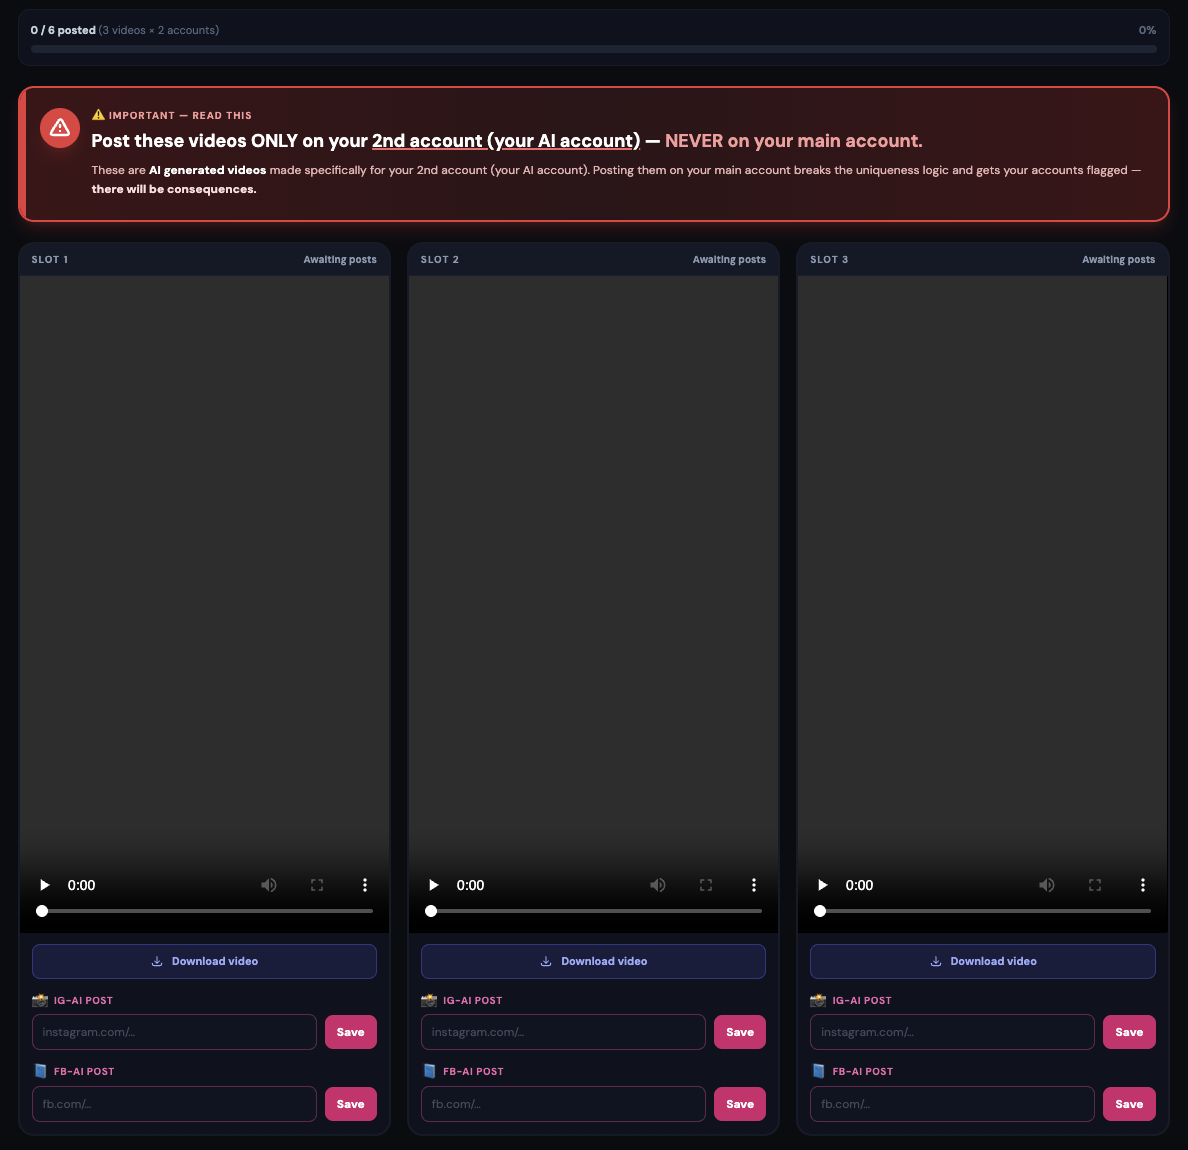
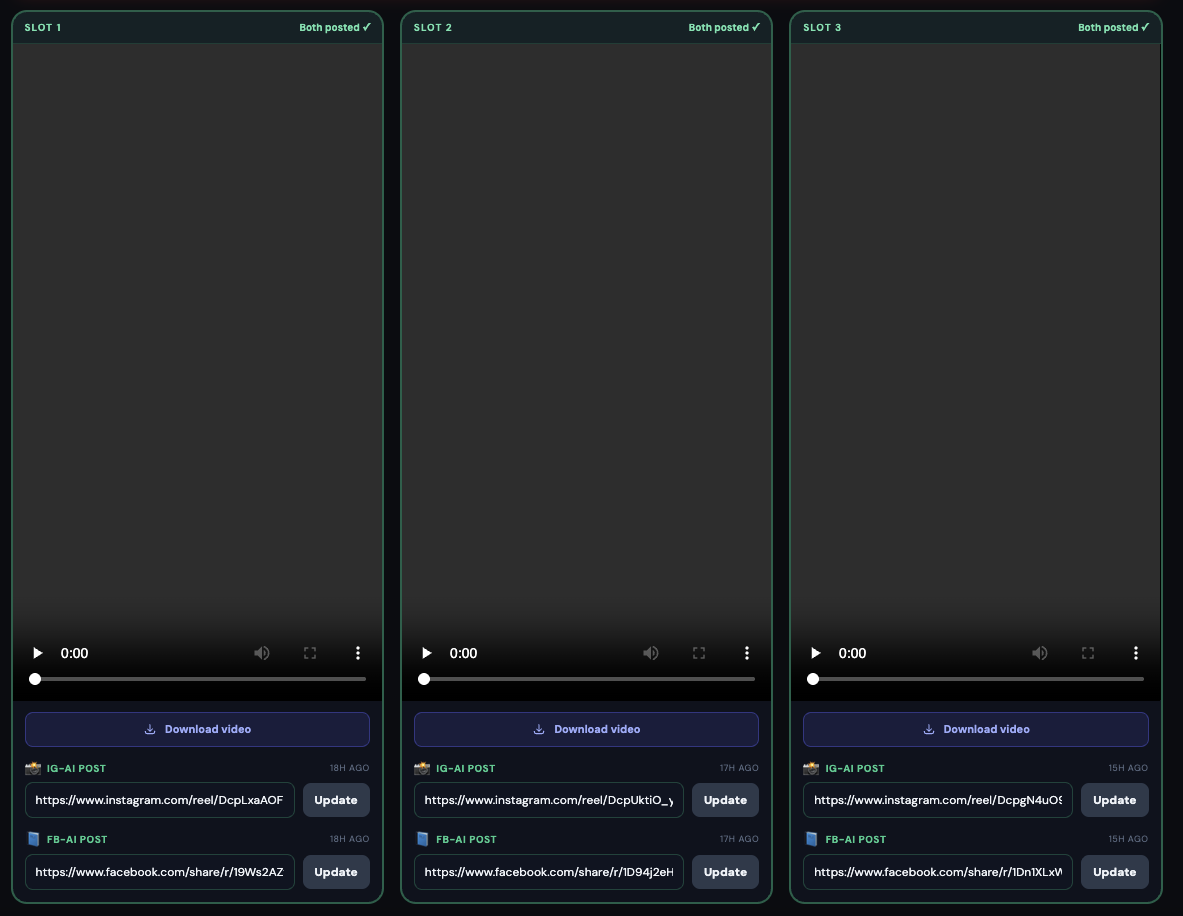
Workflow
- Tap the download icon on each video to save it.
- Post it on the IG-AI account (and if the video is dual-platform, also on FB-AI).
- Copy the post URL(s).
- Paste them into the fields next to the video and tap Save.
Daily AI Videos count toward your Home progress bar and toward your Posts metric. Same as normal feed posts.
Analytics
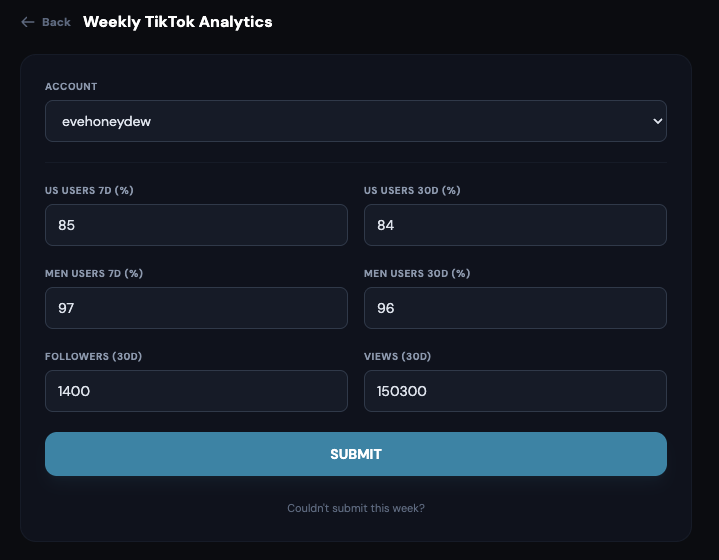
Once a week you submit weekly analytics for each of your accounts. This is how admin knows what's actually working: audience make-up, followers gained, views. The screen is called "Submit Weekly Analytics".
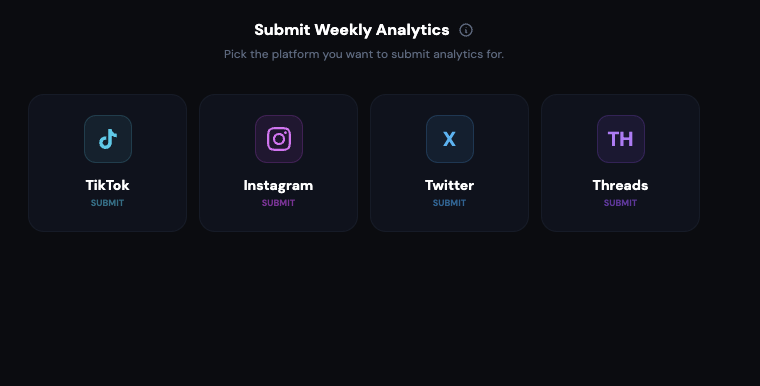
Step 1: pick a platform
When you open the Analytics tab you land on a page with four platform cards: TikTok, Instagram, Twitter, Threads. Each card shows the platform name and a small SUBMIT label. Tap the card for the platform you want to submit numbers for.
Step 2: pick the account
The form opens with an Account dropdown at the top ("Select an account"). Pick the specific account you're submitting for. There is a Back button at the top-left if you picked the wrong platform.
Step 3: fill in the six numbers
Every submission has six required number fields, arranged in three rows of two:
- US Users 7d (%). What percentage of your followers is based in the United States, looking at the last 7 days.
- US Users 30d (%). Same, but looking at the last 30 days.
- Men Users 7d (%). What percentage of your followers is male, last 7 days.
- Men Users 30d (%). Same, last 30 days.
- Followers (30d). How many followers the account gained in the last 30 days.
- Views (30d). Total view count over the last 30 days.
Where to find these numbers on the platform
- Open the platform app on your phone (Instagram / TikTok / Twitter / Threads).
- Go to the account profile, tap Insights or Analytics.
- Look at both 7-day and 30-day time ranges (some platforms let you toggle, others need two visits).
- Read off the audience percentages (US, Men), the follower gain, and the total views.
- Type them into the dashboard form and tap the big SUBMIT button at the bottom.
Couldn't get the numbers for an account?
Same principle as "Couldn't post" on Tasks: never leave a week un-submitted without an explanation. Under the SUBMIT button, at the very bottom of the form, there is a small red link: Couldn't submit this week?. Use it when an account was banned, locked out, has no insights available, or is otherwise inaccessible.
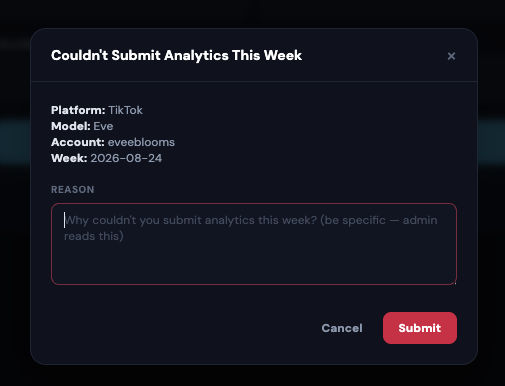
- Tap Couldn't submit this week? at the bottom of the form.
- A modal opens. Pick the reason (banned, locked out, no insights, or type a custom reason).
- Submit. Admin reviews it and either approves (the account is marked "handled" for the week) or rejects (you need to try again).
Research
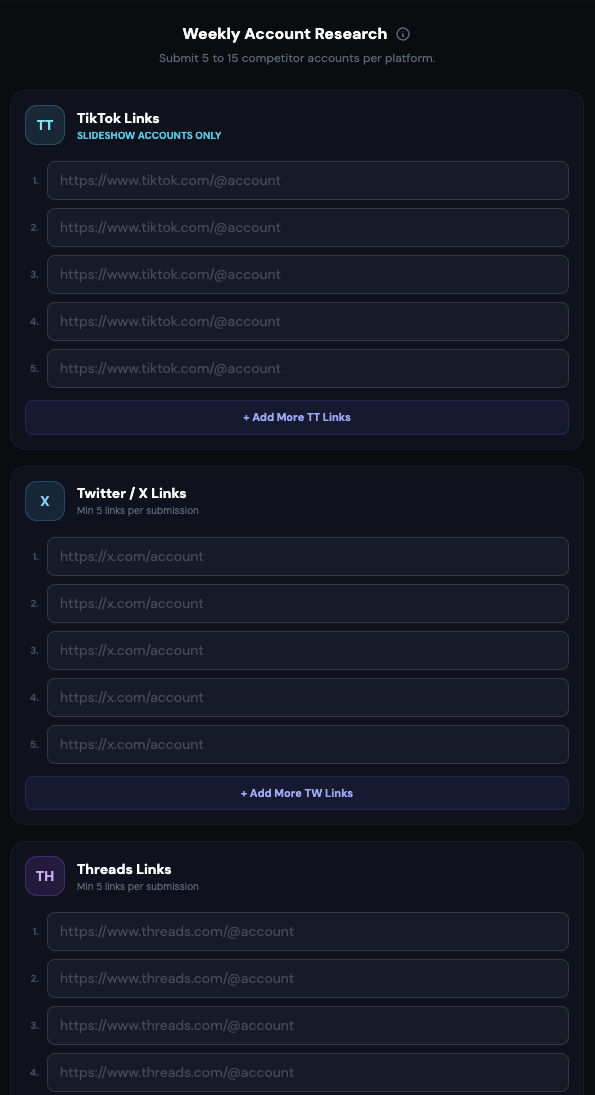
The Research tab is where you submit competitor account links you found on the platforms. Accounts similar to your model that are doing something interesting. Admin uses these lists to spot content trends and decide the model's next direction.
What the page looks like
Title at the top: Weekly Account Research. Sub-line: "Submit 5 to 15 competitor accounts per platform." Below that, three platform cards side by side, one per platform:
- TikTok Links (cyan). Small note underneath: SLIDESHOW ACCOUNTS ONLY. Only submit TikTok accounts that post slideshow-style content, not regular video creators.
- Twitter / X Links (sky blue). Min 5 links per submission.
- Threads Links (purple). Min 5 links per submission.
Adding links
- Under each platform card, an empty input row appears by default.
- Paste the profile URL of the competitor into the input.
- Need more inputs? Tap the + Add More TT Links (or TW / TH) button under the card. A new input row is added.
- Repeat until you have at least 5 (and up to 15) links per platform you're submitting for.
- Tap the big SUBMIT RESEARCH button at the bottom to save the whole batch.
Account Requests
Use this tab when something about one of your accounts changes and admin needs to update the dashboard to match. This is the official channel: do not DM admin about it, put it here so it's tracked and admin can approve or reject with a reason.
The page layout
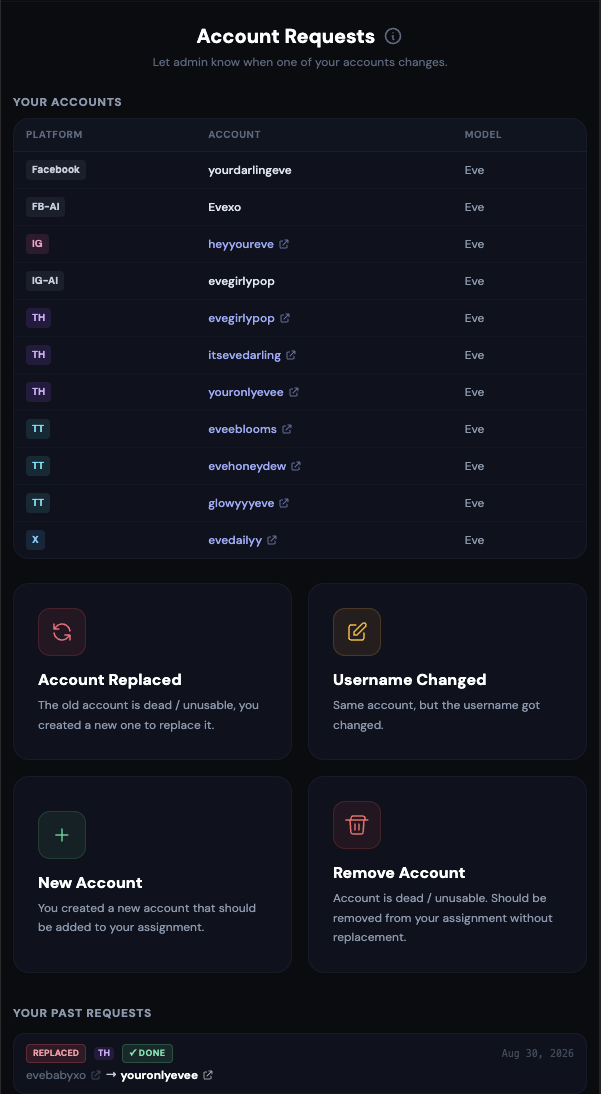
Title at the top: Account Requests. Sub-line: "Let admin know when one of your accounts changes."
- First, a read-only Your accounts block showing every account currently assigned to you. Use this to double-check the handles before filing a request.
- Below that, four large action cards (one per request type, see next section).
- At the bottom, Your past requests: the history of every request you've filed with its current status.
The four request types (four cards)
Account Replaced (red / rose card)
Use when "the old account is dead / unusable, you created a new one to replace it." Old handle stays as a record, new handle takes its slot in your assignment. Fill in old handle, new handle, and (usually) the reason the old one died. This is the most common request when an account gets banned.
Username Changed (amber card)
Use when "same account, but the username got changed." You changed the handle on the platform itself (Instagram, Edit Profile, Username), and now the dashboard needs to match. Same account, same followers, same everything. Just a new name.
New Account (green / emerald card)
Use when "you created a new account that should be added to your assignment." A brand new handle to add, no old handle to replace. For example: admin asked you to create an additional slot, or you set up a fresh backup.
Remove Account (red card)
Use when "account is dead / unusable. Should be removed from your assignment without replacement." Different from Account Replaced: here you're not making a new one, the slot just disappears. Pick a reason and submit. Admin approves or rejects.
Filing the request
- Tap the card for the type you need.
- A form opens with a Back button at the top-left in case you picked the wrong card.
- Fill in the handles and reason the form asks for.
- Submit. The request lands in admin's queue and appears in Your past requests at the bottom of the landing page.
Watching your requests
Every request you file shows up in the Your past requests section at the bottom of the landing view with a status: pending (waiting for admin), approved (done, check the dashboard for the change), or rejected (with admin's reason). Approved and rejected requests stay in the history so you have a paper trail.
Feedback
Your Feedback tab is a two-way channel with admin and your supervisor. You read what they wrote to you, and you write back: reply to notes, or start something yourself by reporting an account incident or sending a note upward. Sub-line at the top: "Send notes to admin and report account incidents."
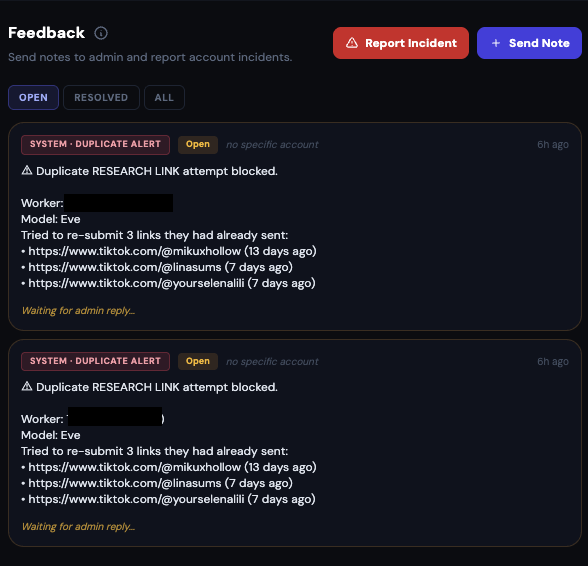
Top-right of the page: two buttons
- Report Incident (red button). Use this the moment something happens to one of your accounts: ban, shadowban, login lock, action block, takedown, warning. Opens a modal where you pick the account, pick the incident type, and describe what happened. The report immediately shows up on admin's side and on your Home page (Open account issues banner).
- Send Note (indigo button). Write a free-form note to admin. A question, a heads-up, an idea. Opens a modal where you type the note and submit.
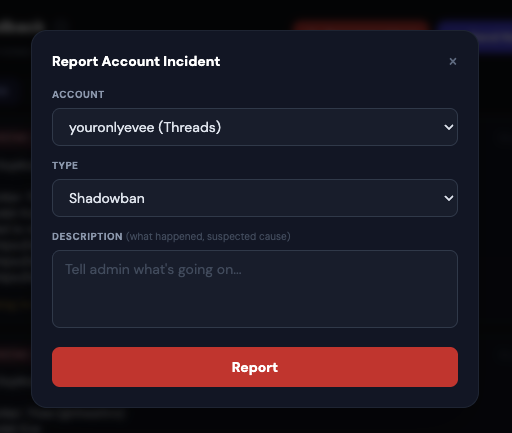
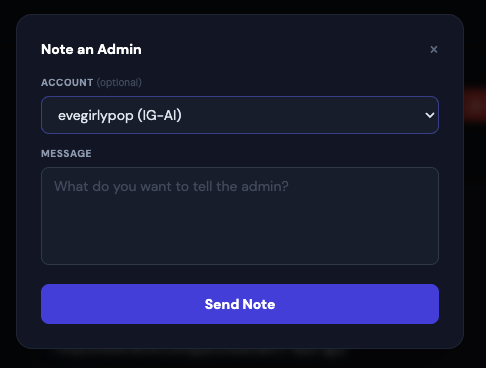
What appears below the buttons
- Open account incidents at the top. Every active incident on one of your accounts, one block per account.
- The note thread below that. Every note between you and admin / supervisor in chronological order. Includes notes admin wrote to you, notes you wrote to admin, replies on both sides.
Note types you'll see from admin / supervisor
- Personal notes. Direct messages like "Fix the bio on @acc, grammar issue."
- Weekly supervisor reviews. A rating (1 to 5 stars) plus written feedback about your week.
- Incident replies. When you reported a ban and admin responded, the response lands here as a reply chip on that incident's thread.
- Automatic tags. The system flags things like "missed 3 posts this week" or "no research submitted."
Replying to a note
- Find the note in the thread.
- Tap the small Reply link on the note.
- A text box opens below. Type your reply and submit. Your reply appears as an indented chip under the note.
Notes badge in the sidebar
When you have unread notes, a small red badge appears on the Feedback tab in the sidebar showing the count. Don't let it sit above 0 for long.
Guides
The dashboard has up to four Guides in the sidebar. Each one is the agency handbook for a specific platform: content standards, do's and don'ts, banned words, posting best practices, tone, safety. Reading a guide is not optional. Every Guide also acts as a gate: finishing it unlocks the matching Intel Tools (see the next section).
The four Guides
- Guide (Sunny Angels main Guide). The core agency handbook. Always visible. Reading this fully unlocks the TikTok Intel Tools: Viral Posts, Viral Videos, Sounds, Hashtags, Generator.
- TW Guide. Twitter / X specific rules. Reading it fully unlocks the Twitter Intel Tools: Viral Posts, Viral Videos, Slide Texte, Bios, Strategy.
- TH Guide. Threads specific rules. Reading it fully unlocks the Threads Intel Tools: Viral Posts, Slide Texte, Bios.
- FB Guide. Facebook specific rules. Only visible if you have Facebook accounts assigned. Currently no Intel tools attached, just the guide itself.
How a Guide is organized
Each Guide is split into sections. Topics vary per guide but usually cover Content, Bios, Captions, Reels, Analytics, Do/Don't lists. You scroll through them one by one. Sections auto-mark as read as you scroll past them, so you do not need to click a checkbox on every one, just actually read them.
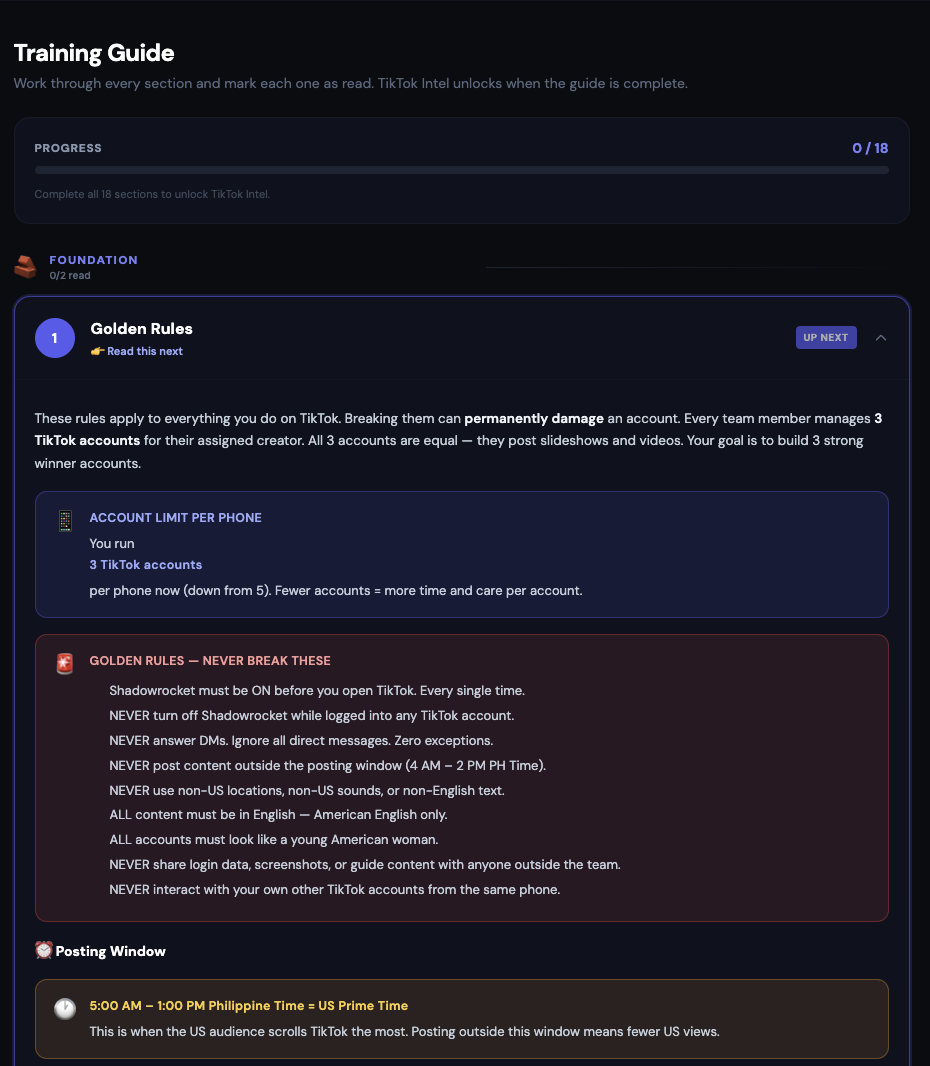
Completion tracking + progress badge
A small badge next to the Guide tab name shows your progress (like 3/12). Once you've scrolled through every section, the badge turns green and the matching Intel Tools appear in the sidebar. Admin sees your Guide progress on their side, so skimming through without reading is visible.
Intel Tools
The Intel Tools are inspiration and research tools per platform. They show you what's currently working on TikTok, Twitter, and Threads: viral posts, popular sounds, trending hashtags, competitor accounts, and a caption generator. Use them before you post to decide what to shoot, what sound to use, what hashtags to add, and how to format your caption.
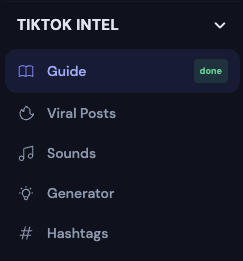
TikTok Intel Tools (unlocked by the SA Guide)
- Viral Posts. Feed of TikToks that recently went viral, sortable and filterable. Look at the ones matching your model's style for content ideas.
- Viral Videos. Similar to Viral Posts but focused on the video content itself: hooks, transitions, formats worth copying.
- Sounds. List of trending TikTok sounds. Copy the sound link and use it on your next post to ride the trend.
- Hashtags. Trending hashtag list. Copy and paste into your captions.
- Generator. A caption / slide-text generator. Give it a topic and it produces caption drafts you can polish and use.
Twitter (X) Intel Tools (unlocked by the TW Guide)
- Viral Posts. Recently viral tweets in your model's niche.
- Viral Videos. Video tweets that took off.
- Slide Texte. Ready-to-use text snippets for slide-style posts.
- Bios. Bio examples from top-performing accounts to inspire your own.
- Strategy. Higher-level posting strategy notes for Twitter / X.
Threads Intel Tools (unlocked by the TH Guide)
- Viral Posts. Recently viral Threads posts.
- Slide Texte. Text snippets that work well on Threads.
- Bios. Threads bio examples.
Facebook Intel
Facebook currently has no Intel Tools attached. Only the FB Guide is available, and only if Facebook accounts are assigned to you.
Profile menu (top right)
Top-right corner of every page: your avatar (an indigo rounded square with the first letter of your name inside), followed by your name and a small down-chevron. Tap anywhere on that block to open the profile menu dropdown.
What's inside the dropdown
- Header strip (top of the dropdown). Shows your worker name and login email so you can double-check you're signed in as the right person, especially on a shared device.
- Switch Model button. Only appears if admin assigned you more than one model. Tap it to open a picker and switch which model's data the dashboard is showing. Everything reloads for the new model: Home, Tasks, Accounts, Tracking, My Performance.
- Logout button (red on hover). Signs you out of the browser and wipes local session data. Use it on shared or public computers, or when you're done for a long time.
FAQ / Troubleshooting
I don't see my accounts
Open the profile menu (top-right) and check which model is selected in the header strip. If you were assigned more than one model and the wrong one is active, tap Switch Model. If the right model is selected but the account list is still empty, tell admin. Your account assignment probably needs to be set up on their side.
My post link was rejected
The URL has to be the specific post URL, starting with https://. The bare profile URL doesn't work. Copy the link using the share icon on the platform, that always gives you the correct URL.
The Reel "Done" button won't accept my link
The link has to be a real Instagram reel URL: https://www.instagram.com/reel/… or https://www.instagram.com/p/…. Nothing else works. If it still fails, the reel may have been reassigned in the meantime. Refresh the page and check the reel card again, or ask admin.
I completed the Guide but the Intel Tools are not showing
Two things to check. First, make sure you actually scrolled through every section (sections auto-mark as read as you scroll past them, so scrolling too fast can skip one). Look at the badge next to the Guide tab in the sidebar, it should be green / full. Second, do a hard refresh (Ctrl+Shift+R on desktop, or pull-to-refresh on mobile). If the tools are still hidden, tell admin.
I switched model but I still see the old data
Do a hard refresh (Ctrl+Shift+R on desktop, or close the tab and reopen it on mobile). Most sections reload automatically when you switch model, but a few cached views may stick until the page reloads.
I forgot my password
Ask admin to reset it. Admin has a Reset button that generates a new password. You get it once, save it immediately somewhere safe. It cannot be recovered later.
My follower numbers went down
Open My Performance and check the Account Health section. If more than a couple accounts are red (declining), open the Quick Leaderboard next to it and see which handles are dropping. Report ban / lockout patterns via Account Requests; for content-driven drops, adjust posting style and ask your supervisor for feedback through the Feedback tab.
My streak reset even though I posted every day
The dashboard counts days in Philippines time (PH). If you post late night your time and it's already past midnight in PH, the post counts for the next PH day. Check the Tasks tab date arrow at the top. If a day genuinely shows all posts done but the streak reset, tell admin.
Something is broken or feels wrong
Send admin a message via Telegram with:
- Which tab you were on
- What you clicked
- A screenshot of the screen
- If you know how: also a screenshot of the browser console (F12, then Console)
The more detail, the faster the fix.
A good day in one line
Log in → check Home for open notes → work through Tasks until the progress bar is full → on Sundays, submit weekly Analytics → log 1–2 Research entries → close the app. Every day.